6.131, Power Electronics, has been a blast, even if it's completely destroyed any belief I have that I can build a functional circuit. Lectures are awesome and Practical Electronics for Inventors is and awesome and completely readable / understandable book.
Here are the main analogies I have learned through 6.131 in terms of relating power electronics to mechanical mechanisms:
Totem pole: because your comparator's square wave cannot directly drive FETs (not able to source enough currrent)
Boost converter: (e.g. takes 6V and turns into 15V -- usu. cannot get it to gain more than 1 order of magnitude). Like winding up a fishing rod (inductor charging capacitor while diode prevents cap from discharging back into inductor), build up power (pool fishing wire behind you), and then release (snap fishing rod forward).
(thus, do NOT hook up without load because it is like winding up the fishing rod and and whacking the wall repeatedly, over and over, at some kHz aka many times per second).
Buck converter: (e.g. takes 15V and turns into variable 0 to 12V). -- a switching amplifier (linear amplifier, like 7805, dumps extra power as heat, while switching stores in cap for later use).
transformer trades off voltage and current like mechanical gearbox trades off speed and torque. also, by power conservation, (and used to measure parasitics / Lleak and Lmag), short one side of transformer = short other side, open circuit one side = open circuit other side.
--> todo: reflecting things across the transformer
regulated voltage -- a wall wart http://www.ladyada.net/learn/powersupply/ counts, and then can be further filtered ala 2.007 nano carrier with as switching power supply
===== debugging...
Also, circuit debugging things that 6.131 has taught me:
Getting crazy fuzzy on your 74HC delay circuit? (ringing) -- check if you have bypass caps, both on your 12v and 5v rails. (For me, connection a cap across pins 14 and 7 didn't work either, but dropping a cap across 5v rail worked instantly).
2125 debugging: does not required Vdd, merely requires Vcc and the inputs from the delay circuitry. Pin 2: input. Pin 7: output. On high side, measuring directly may not work (get fast flickering or no visible signal) -- to measure high side output, stick probe gnd on pin 5 (gnd) and probe in 7 (output). Same for A (which cannot be measured without a load?)
Totem pole drawing max current when your high side signal from the delay circuit is plugged in?
Check that all the grounds are connected.
If you're at MITERS, check that it's not a sketchy scope probe / scope problem.
Do NOT build complicated circuits (e.g. control circuitry) straight on the protoboard, no matter how sure you are of building it correctly -- you can spend hours and have a short somewhere and be hard-pressed to diagnose it or rule your control circuit out as the source of your [short, bug]. Build it on the breadboard first -- it really is actually must better than protoboard, no matter any concerns about breadboard sketchiness, the faster prototyping time is definitely worth it.
Building the delays and 555s with unclipped resistors and caps may not be a bad idea, since you'll reuse these circuits and lot but will need to change the values from lab to lab.
Go-kart circuit from lab 2 is reused in lab 3 -- make sure you have a working totem pole, or else that will eat unnecessarily into lab 3 time.
Start on the labs early! and ask for help. Even if it seems like a dumb circuit that should just work, if you're stuck, asking an experienced circuiteer for help will work wonders and you'll learn a ton about the circuit too, including all the individual parts which you'll need to know to help anyone else debug and which you wouldn't pay attention to if you simply breezed through to a working circuit.
your 74HC wants 5V, not 12V!
connect ALL your grounds.
==== misc from this week: lamp ballast:
to find the resonant frequency, you can try to calc by f = 1 / (2*pi*sqrt(L * C)) = (somewhere in 30 to 40 kHz) and measuring the exact L that you actually wound. alternatively, run the FETs on the totem pole (Vdd) at 12v (Vcc for the IR2125's is 12V and pulled via a wire from the control circuitry, which you breadboarded on a separate board instead of protoboarded straight on the totem pole board, right?) and adjust the frequency (via pot on 555 or whatever you are using to generate square wave being fed into 311 comparator), sweeping the 30 to 40 kHz range until you found where your power supply is supplying the most current. For me, I found the current peaked at 0.38A at 12v at ~32 kHz (and diminishes to either side), while my calculated resonant frequency was closer to 35kHz. This was the magic sauce that led to my fluorescent bulb striking, yay!
also, you want to ground the ERR pins on the IR2125 / totem with jumpers if you want the 2125s to work. The may work without pulling to ground explicitly, but best not even have to worry about it.
Thursday, October 27, 2011
Monday, October 24, 2011
molding and casting research
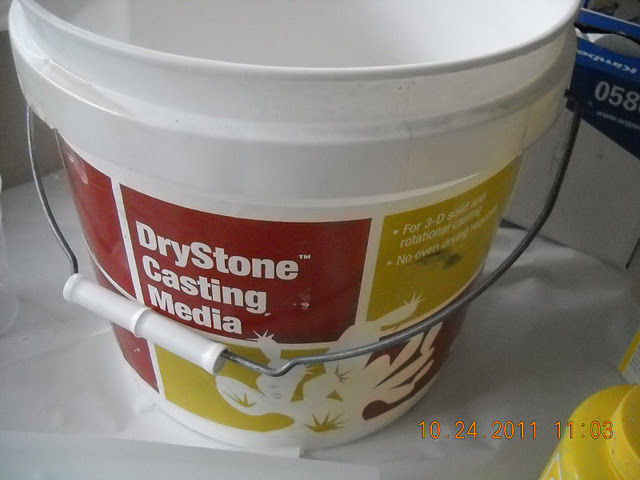
I conclude that yes, hydrostone and drystone (which mas.863 has lots leftover) can be used for metal casting.
http://www.lagunaclay.com/catalog/pdf/lcc_plaster.pdf
USG PLASTERS & GYPSUM CEMENTS FOR ART, STATUARY & CASTING APPLICATIONS
DRYSTONE Fast-casting gypsum cement that provides strong, durable casts without the need for dryers. Excellent compressive strength and good
impact resistance. Enhanced flexural properties. Low absorption for reduced paint demand. Environmentally preferred to resin-based
alternatives. Available in solid or hollow cast formulas.
HYDRO-STONE Especially suitable where high strength and resistance to wear are necessary. Used in high-quality art and novelty castings, molds, figurines,
modeling material, anchoring material, density fill applications, lamp bases, and die production. Works well in most mold materials, especially
flexible molds. Expansion about two times greater than Hydrocal A-11. Self-leveling when poured and not suitable for hollow cast
applications
http://www.sheffield-pottery.com/US-Gypsum-Plaster-Information-s/38.htm
DRYSTONE - Fast setting high strength product that needs no drying. An environmentally sound alternative to resin-based products. No hazardous chemicals or waste, no styrene emissions and no required environmental controls.
HYDRO-STONE - One of the hardest and strongest of all gypsum cements. When mixed properly, has a heavy, syrupy consistency ideal for pouring solid models or patterns. Recommended for stretch-press dies where extreme surface hardness is required. Slightly higher setting and expansion than ULTRACAL 30. Used for high quality art novelty and statuary castings.
http://en.wikipedia.org/wiki/Plaster_mold_casting
http://chestofbooks.com/reference/Henley-s-20th-Century-Formulas-Recipes-Processes-Vol1/Casting-Plaster-Molds.html
plaster is used for metal casting but requires drying for several days
http://www.artlex.com/ArtLex/G.html
gesso - Plaster or a fine plaster-like material made of gypsum, which is also called whiting, used for sculptures. An especially versatile medium in reliefs, gesso can be either a material cast in a mold or a material of a mold, a material to be modeled, or carved, or attached to something else. When used for molds into which molten metal is poured, it must be hardened with sand as a grog. Gesso may also refer to such a gypsum material mixed with an animal-hide glue and used as a ground for painting. For this latter use, it isWEAR A DUST MASK! usually applied to the surface of a wood panel or sculpture to become the surface on which an artist paints. It was used by Gothic and Renaissance panel painters, and is still used today. Oxgall (or another wetting agent) can be employed MEDICAL ALERT!to eliminate pin-holes in gesso surfaces by mixing it into the gesso before the gesso is applied. Like all other dusts, airborne gesso is hazardous to breathe — every user should wear an appropriate dust mask. Also see slip and stucco.
therefore gesso is probably food safe. so if I coat my pink foam model (which can cause sensitivity with prolonged exposure -- cue architecture student horror stories) with gesso and then cast it with food-safe silicon, should be good.
overview of molding techniques
http://miniatures.about.com/od/techniques/tp/moldputtylist.htm
discussion of 3d-printing plaster molds
http://forums.reprap.org/read.php?171,37834,3783
Nyancat party! in aluminum, egg, foam, silicone, hydrostone, and drystone
MAS.863, Fall 2011
Week 6
Molding and Casting -- Nyancat party! in Egg, Silicone, Plastic, Hydrostone, Aluminum, and Foam
We can use molding and casting to easily replicate a design.
The analogies between this manufacturing process and internet memes are clear.
Thus, I am compelled to make nyancats!
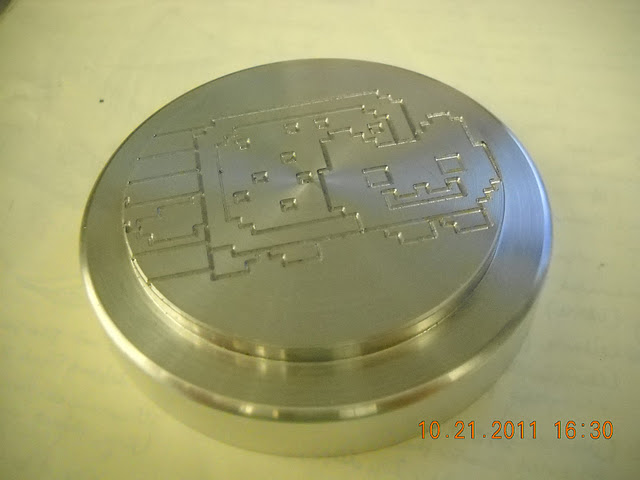
Aluminum paperweight. File done in solidworks, export as DWG to Mastercam, turned on CNC lathe (daewoo puma) and milled with engraving tool to 0.02’’ depth on CNC mill (EZ trak). Used as mold positive.
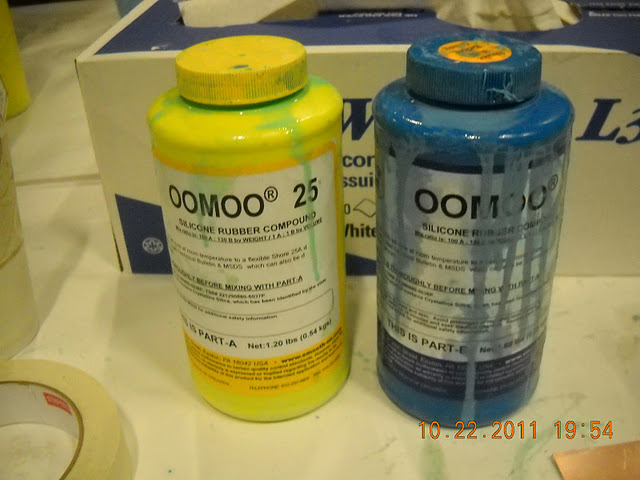
Smooth-on OOMOO25 used as silicone mold (negative). 100 parts A : 130 parts B by weight, pot time ~15 minutes, cure time ~1 hour.
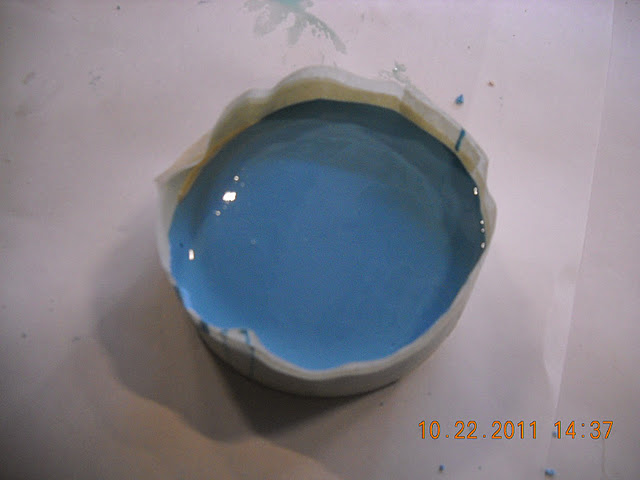
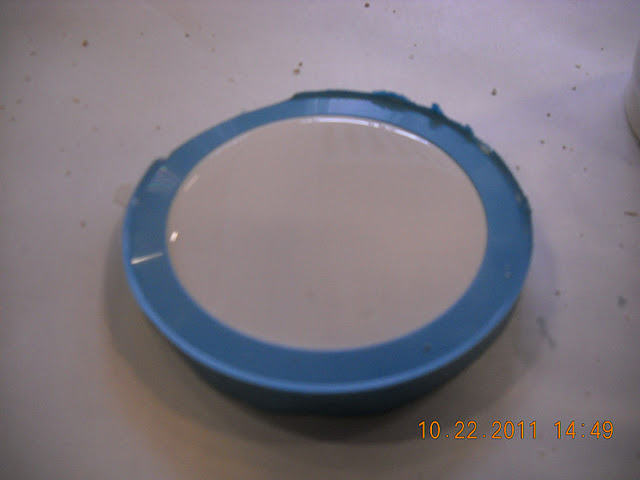
Masking tape used to form “walls” for negative mold.
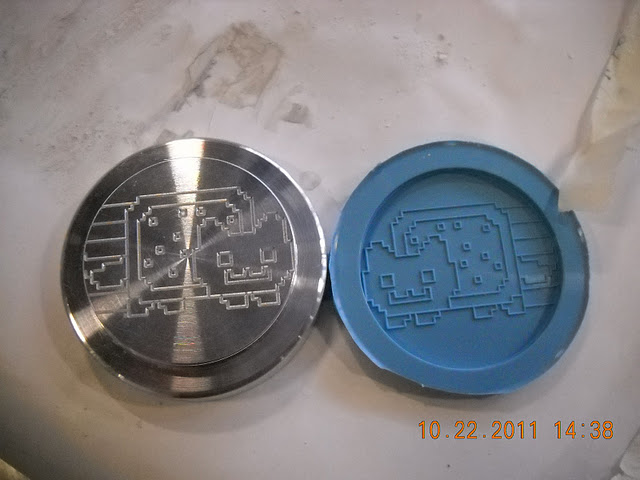
Released fine (no releasing agent used). Fine features (0.02’’) reproduced cleanly.
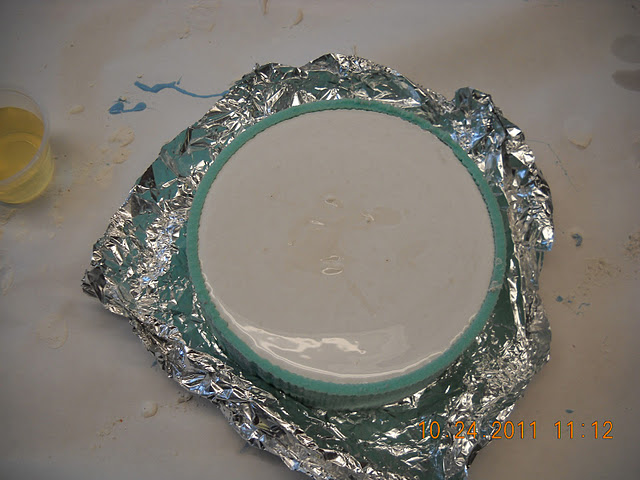
Hydrostone casting, positive.
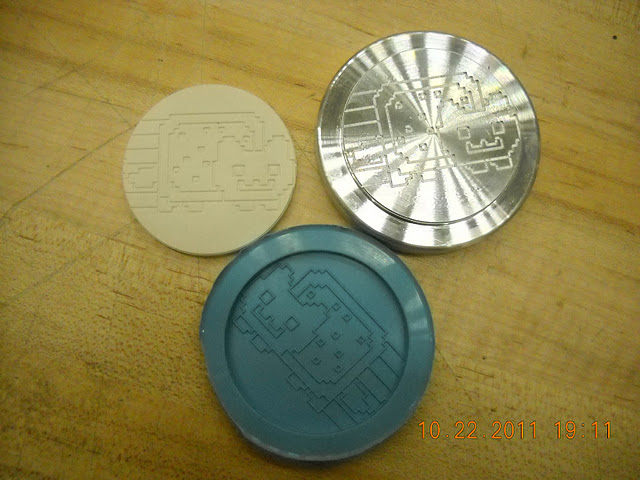
Final result: one nyancat party.
nyanegg?
Just for fun: some egg?

End result:
Not so great. I await the shopbot 3D mold.
hot glue mold: jello legos
Previously on Bad Ideas:
Hot glue is nontoxic, right? Legos used to create positive for hot glue. Crisco applied as releasing agent -- did not release well, had to pry out legos, destroying them. Jello poured in -- very nice, can even see the “LEGO” lettering on the bumps. Jello lego’s had flat bottoms though, since this is a one-part mold.
nyancake?
On Saturday, I learned that I now have media lab shop access and can now devote my entire weekend to MAS.863! Yay!
I made the model in Solidworks while still hoping I could get my hands on some food safe silicone. This didnt happen, though Iḿ not sure why. Ah well. I went ahead anyway and cut my model on the shopbot out of foam
.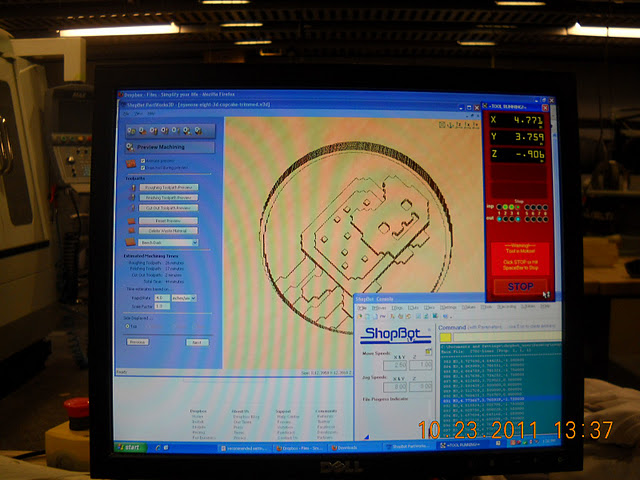
1/8´’ bit, though later I remember I had resized my model specifically for a 1/4´’bit which could have cut my time down by half. After 1.5 hours of cutting I had my mold (the partworks estimate was 45 minutes). The deepest parts the shopbot just barely cleared (that was nervewracking!). The cut-out toolpath the shopbot most definitely did not clear -- I was prepared and hit the e-stop button immediately.
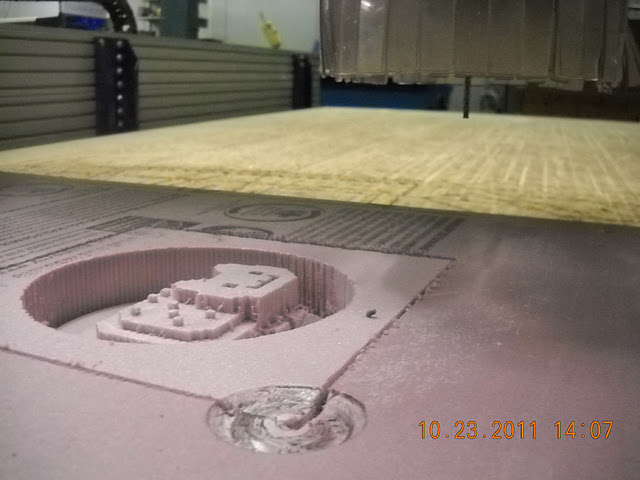
There were a lot of burrs and the finish quality was less than what Id expected. But Iḿ not complaining, since Iḿ using a shopbot to cut out an internet meme...
I attempted to deburr with a heat gun but stopped immediately when I realized I was rounding out my beloved sprinkles. I ended up using an air compressor and getting pink sprinkles all over myself.
Then I cast a negative mold with smooth-on silicone, in this case mold star slow since the arch shop was out of oomax 25. Pot time 50 mins, cure time 4 hours. After 1.5 hrs I took my mold with me instead of waiting. Mold turned out fine. Probably used half a smooth-on set of material.
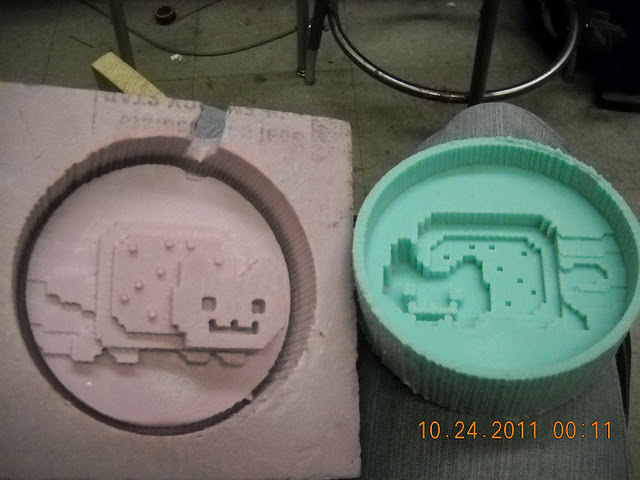
I had to commit some violence to the mold original in order to get the silicone out, simply due to the geometry of the piece. The silicone separated from the foam just fine.
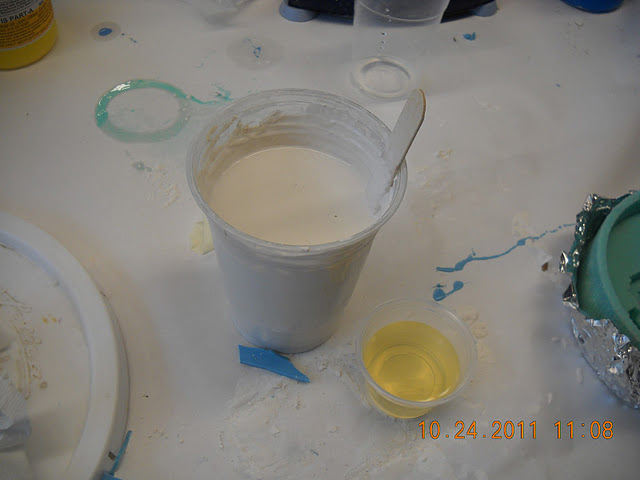
Drystone casting followed. Required almost exactly ~1.5 cups of material. (500grams?)

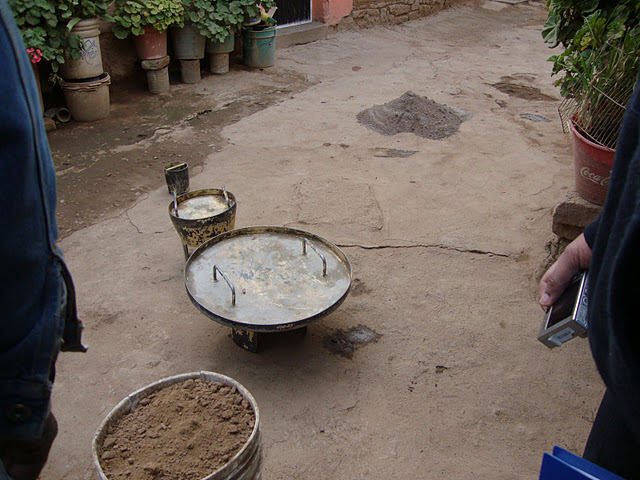
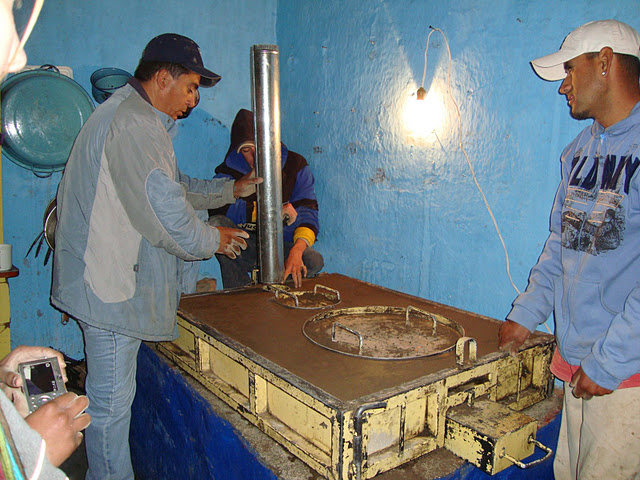
Oh, this reminds me, I´ve done sand casting before too. We helped sand-cast a cement health-friendly stove in La Vaquita, Mexico. This was a government initiative of some sort.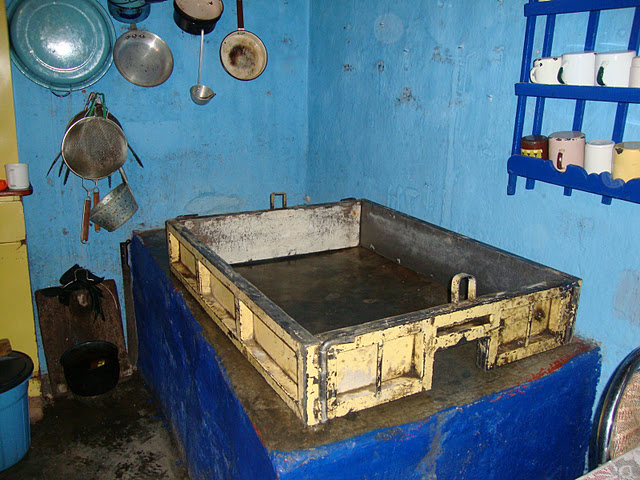

Files coming soon. [edit: 4 Sept 2012. So maybe not soon. But I'll try to get around to it. Also I would like to point out to blog readers that I went on to make nyancake and nyanjello! :D http://orangenarwhals.blogspot.com/search/label/nyancake

Week 6
Molding and Casting -- Nyancat party! in Egg, Silicone, Plastic, Hydrostone, Aluminum, and Foam
We can use molding and casting to easily replicate a design.
The analogies between this manufacturing process and internet memes are clear.
Thus, I am compelled to make nyancats!
 |
| nyanweight? nyancoaster? |
Aluminum paperweight. File done in solidworks, export as DWG to Mastercam, turned on CNC lathe (daewoo puma) and milled with engraving tool to 0.02’’ depth on CNC mill (EZ trak). Used as mold positive.
Smooth-on OOMOO25 used as silicone mold (negative). 100 parts A : 130 parts B by weight, pot time ~15 minutes, cure time ~1 hour.
Masking tape used to form “walls” for negative mold.
Released fine (no releasing agent used). Fine features (0.02’’) reproduced cleanly.
Hydrostone casting, positive.
Final result: one nyancat party.
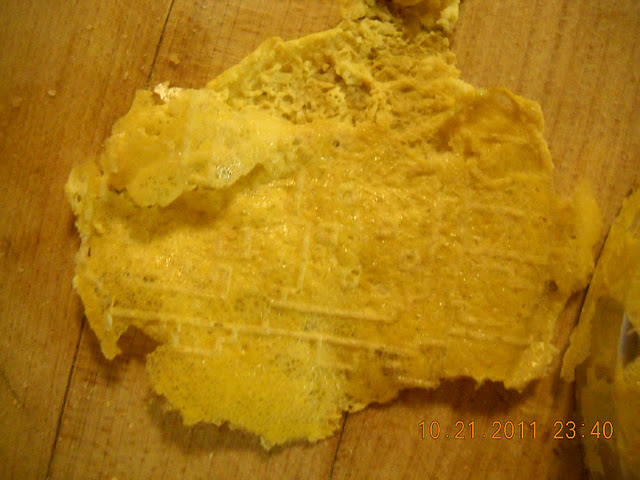
nyanegg?
Just for fun: some egg?
End result:
Not so great. I await the shopbot 3D mold.
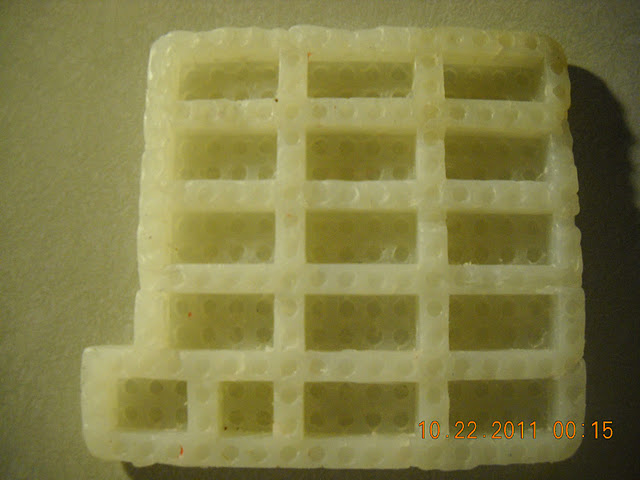
hot glue mold: jello legos
Previously on Bad Ideas:
Hot glue is nontoxic, right? Legos used to create positive for hot glue. Crisco applied as releasing agent -- did not release well, had to pry out legos, destroying them. Jello poured in -- very nice, can even see the “LEGO” lettering on the bumps. Jello lego’s had flat bottoms though, since this is a one-part mold.
nyancake?
On Saturday, I learned that I now have media lab shop access and can now devote my entire weekend to MAS.863! Yay!
I made the model in Solidworks while still hoping I could get my hands on some food safe silicone. This didnt happen, though Iḿ not sure why. Ah well. I went ahead anyway and cut my model on the shopbot out of foam
.
1/8´’ bit, though later I remember I had resized my model specifically for a 1/4´’bit which could have cut my time down by half. After 1.5 hours of cutting I had my mold (the partworks estimate was 45 minutes). The deepest parts the shopbot just barely cleared (that was nervewracking!). The cut-out toolpath the shopbot most definitely did not clear -- I was prepared and hit the e-stop button immediately.
There were a lot of burrs and the finish quality was less than what Id expected. But Iḿ not complaining, since Iḿ using a shopbot to cut out an internet meme...
I attempted to deburr with a heat gun but stopped immediately when I realized I was rounding out my beloved sprinkles. I ended up using an air compressor and getting pink sprinkles all over myself.
Then I cast a negative mold with smooth-on silicone, in this case mold star slow since the arch shop was out of oomax 25. Pot time 50 mins, cure time 4 hours. After 1.5 hrs I took my mold with me instead of waiting. Mold turned out fine. Probably used half a smooth-on set of material.
I had to commit some violence to the mold original in order to get the silicone out, simply due to the geometry of the piece. The silicone separated from the foam just fine.
Drystone casting followed. Required almost exactly ~1.5 cups of material. (500grams?)

Oh, this reminds me, I´ve done sand casting before too. We helped sand-cast a cement health-friendly stove in La Vaquita, Mexico. This was a government initiative of some sort.
Files coming soon. [edit: 4 Sept 2012. So maybe not soon. But I'll try to get around to it. Also I would like to point out to blog readers that I went on to make nyancake and nyanjello! :D http://orangenarwhals.blogspot.com/search/label/nyancake

Thursday, October 13, 2011
centrifugal switches (spin activated yoyo electronics)
doing some research for 2.008 instead of freaking out over 6.131 lab
Edit 10/17/2011: Found it! Thanks to Charles.
See explanation of "tilt sensors," which include both mercury and rolling-ball type ones, here: http://www.ladyada.net/learn/sensors/tilt.html
Cost: $2.00.
(octopart search: http://octopart.com/partsearch/#search/requestData&q=tilt+switch&rangedfilters%5Bavg_price%5D%5Bmin%5D=0.54&rangedfilters%5Bavg_price%5D%5Bmax%5D=2 can maybe get it for $1)
http://smparts.com/-Switches-Rolling-ball-switches-%28AT%29/c0_2_561/index.html -- but no prices listed, hah.
Hmm. So I know there was at least one previous design in 2.008 that used these switches. They put two on each side (top and bottom), facing outwards. Then, when the yo-yo spun, both switches would contact (and presumably switch on LEDs). Apparently they had issues with the thermoform shrinking and squeezing the ball switch and preventing it from switching though. All in all, I'm a bit iffy about these rolling ball switches. There's no way to adjust their sensitivity (although I guess regardless PoV yoyo requires a microcontroller anyway, but the less pin-count the better), so what if it switches on when the the switches are rotated to (left right) and the yo-yo is slightly tilted? We'd be stuck with 100 useless switches.
I like Paulina Mustafa's design of a flexure switch, she was prototyping this at MITERS (but I can't find a blog for her). Looks sort of a like a ying-yang design, and the tips are flung outward and make contact with the sides when the yo-yo is spun. She's using copper-tape, but I think something like conductive glue would be easier to apply.
http://www.instructables.com/id/Conductive-Glue-And-Conductive-Thread-Make-an-LED/step1/Make-Conductive-Glue-Conductive-Paint-and-Conduc/
=====
Earlier Research
via
http://www.helifreak.com/showthread.php?t=33567 "DIY Night Blades"
centrifugal switches:
http://www.atomicmods.com/Categories/Tutorial-1-28-Mini-Z-Rim-Light-Installation.aspx
(spring inside a brass tube)
types of switches and design of switch contacts (including mercury switch aka "tilt switch"): http://www.allaboutcircuits.com/vol_4/chpt_4/1.html
quora question
http://www.quora.com/Mechanical-Engineering/What-centrifugal-switches-are-suitable-for-use-in-a-yo-yo
still failing to find suppliers o.o
mercury switch:
http://mondo-technology.com/yoyo.html
paperclip style:
http://www.make-digital.com/make/vol22?pg=115#pg117
Edit 10/17/2011: Found it! Thanks to Charles.
See explanation of "tilt sensors," which include both mercury and rolling-ball type ones, here: http://www.ladyada.net/learn/sensors/tilt.html
 |
| http://www.adafruit.com/products/173 |
(octopart search: http://octopart.com/partsearch/#search/requestData&q=tilt+switch&rangedfilters%5Bavg_price%5D%5Bmin%5D=0.54&rangedfilters%5Bavg_price%5D%5Bmax%5D=2 can maybe get it for $1)
http://smparts.com/-Switches-Rolling-ball-switches-%28AT%29/c0_2_561/index.html -- but no prices listed, hah.
Hmm. So I know there was at least one previous design in 2.008 that used these switches. They put two on each side (top and bottom), facing outwards. Then, when the yo-yo spun, both switches would contact (and presumably switch on LEDs). Apparently they had issues with the thermoform shrinking and squeezing the ball switch and preventing it from switching though. All in all, I'm a bit iffy about these rolling ball switches. There's no way to adjust their sensitivity (although I guess regardless PoV yoyo requires a microcontroller anyway, but the less pin-count the better), so what if it switches on when the the switches are rotated to (left right) and the yo-yo is slightly tilted? We'd be stuck with 100 useless switches.
I like Paulina Mustafa's design of a flexure switch, she was prototyping this at MITERS (but I can't find a blog for her). Looks sort of a like a ying-yang design, and the tips are flung outward and make contact with the sides when the yo-yo is spun. She's using copper-tape, but I think something like conductive glue would be easier to apply.
http://www.instructables.com/id/Conductive-Glue-And-Conductive-Thread-Make-an-LED/step1/Make-Conductive-Glue-Conductive-Paint-and-Conduc/
=====
Earlier Research
via
http://www.helifreak.com/showthread.php?t=33567 "DIY Night Blades"
centrifugal switches:
http://www.atomicmods.com/Categories/Tutorial-1-28-Mini-Z-Rim-Light-Installation.aspx
(spring inside a brass tube)
The batteries are wired in series with the LED and the centrifugal switch. The centrifugal switch is simply a tiny spring inside a brass tube. When you accelerate, the spring swings to the outside and makes contact with the brass tube turning on the lights. It is really quite simple and very reliable. This also makes the batteries last a long time since they are only on while you are driving and you will never forget to turn them off.
types of switches and design of switch contacts (including mercury switch aka "tilt switch"): http://www.allaboutcircuits.com/vol_4/chpt_4/1.html
quora question
http://www.quora.com/Mechanical-Engineering/What-centrifugal-switches-are-suitable-for-use-in-a-yo-yo
still failing to find suppliers o.o
mercury switch:
http://mondo-technology.com/yoyo.html
paperclip style:
http://www.make-digital.com/make/vol22?pg=115#pg117
Tuesday, October 11, 2011
abusing CNC mills for internet memes
It's official. CNC mills are sexy. Even decades-old bridgeport model ones that take giant floppies.
(The way I did it is I did a Tools>Sketch Tools>Sketch Picture, then resized that reference nyancat picture until it looked appropriate. I then put a Tools>Options>Grid>Major Grid 0.07 / minor grid off. System Snaps>check Grid. Also, make sure Units>IPS, InchPoundSomething. Then just trace it with lines).
The jig was made by the instructors for the class, along with the "offset" used in Mastercam to make sure the blank is positioned correctly.
Nyanweight documents:
https://docs.google.com/leaf?id=0B9r0HZeoMbmgZjgzMTkyOTEtOTU4OS00MDhjLWJlMmYtNTQzMjc2YmJlMzkx&hl=en_US
where "base/lab1" docs are for the CNC lathe and "engraving" docs are for the CNC mill.
Software used: solidworks (.sldprt, exported to .dwg), mastercam
Todo next: Mill out the actual thing.
So a while back I was all like "I'mma mill me some nyancat for my 2.008 paperweight." (http://orangenarwhals.blogspot.com/2011/09/nyancad-correct-motivation-for-learning.html)
Oh yea, my partner for this lab is the awesome Cappie Pomeroy. He did all the lathe work o.o so don't ask me about that.
So I got around to milling it.
 |
| look, nyancat got fatter so that you can fit a 1/16'' end mill between it's crevices! |
However, my resizing and retracing ended up not mattering, since I decided to engrave it. This was because we had to make a 15 minute version, and no matter how I tweaked Mastercam (using 0.02'' depth instead of 0.1'', using a wide endmill to clear it and then remachining with the 1/16''), there was no way the full 3D paperweight was milling out in 15 minutes.
 |
| Yea so there are really dumb ways to make a path in Mastercam. |
See the X'd out paths to the left -- I was tracing all the paths by hand, essentially. Then Pat, the shop instructor, came by and showed me the magic of the the "polygon" tool which will automatically apply a function (in this case, engraving) to everything within that polgyon. It created some weird paths, like you get on a lasercutter which doesn't recognize your vector as one shape but as individual lines*, but it gets the job done. In other words, he finished in 10 minutes what was taking me hours to do... hah.
*aka it doesn't trace them continuously but rather jumps back and forth between different lines in the drawing
See link below for g-code / mastercam / solidworks files.
 |
| gahhh technical difficulties. Yes, I used my phone to take a picture of picture on my camera. You really don't want to know. |
https://docs.google.com/leaf?id=0B9r0HZeoMbmgZjgzMTkyOTEtOTU4OS00MDhjLWJlMmYtNTQzMjc2YmJlMzkx&hl=en_US
where "base/lab1" docs are for the CNC lathe and "engraving" docs are for the CNC mill.
Software used: solidworks (.sldprt, exported to .dwg), mastercam
Todo next: Mill out the actual thing.
Wednesday, October 5, 2011
todo, DIY vending machine (countertop and oshw)
 |
| Like this, but with arduinos. and caffeine. and breadboards. and 1/64'' drill bits. and nyancat-etched poptarts. Oh, and open source. And constructable for less than $600. |
(I get to the whole build-my-own vending machine thing further down the page. Got a bit ADD).
Well, in other news, my 2.008 group did not fall over themselves to build a PoV yoyo. This is okay. I will just make one or two PoV (persistence of vision) yoyo's manually then. (you, dear reader, have just been saved from a pages-long rant as I sulked over the last few days :P)
In other news, in MAS.863, it's waterjet and shopbot week! I'm super-excited.
 |
| <3 3-axis mill. Shopbot r awesome~ |
 |
| http://mako.cc/copyrighteous/20110725-00 |
)
Mini projects this week:
[1] Shelving. make this (playatech's plans -- rec'd by fellow classmate novysan, who had fun with these at burning man. also rec'd "nomadic architecture" which sadly did not mean nomadic furniture like Walking Hexapod Racing Chair but rather furniture suited for nomadic humans)
 |
| http://www.playatech.com/index.php?deptName=03Bare%20Necessities&prodDesc=09Gear%20Gizmo |
(aka shelving made from one sheet of $8 7/16'' OSB plywood,
 |
| http://www.homedepot.com/h_d1/N-5yc1v/R-100091344/h_d2/ProductDisplay?langId=-1&storeId=10051&catalogId=10053) |
Styrofoam furniture: http://dornob.com/laser-cut-styrofoam-seats-solid-3d-polystyrene-chair-design/
[2] I have lots of marble leftover from our clock class, which some people took proper advantage of while I merely used lasercutter and acrylic:
 |
| classmate's AWESOME marble koi fish clock |
 |
| mmm, instant noodles. aww. I miss my old room. |
Oh right, where was I?
Arduino vending machines. That's right. Make a DIY "open-source hardware" vending machine. Not interested in the electronics of accepting money and such (although that's what everybody leaps to help with that, despite me explicitly stating I'm more interested in the vending mechanism).
Research:
http://en.wikipedia.org/wiki/Vending_machine#Mechanism
www.discapa.com/eng/download/manualt/MTMacSpiralE -- coin mechanism and spiral set? not sure what it vended
http://www.vending.com/vending_machines/combination_vending_machines/combo/manual/
So they're called "augers."
 |
| from: http://www.vending.com/vending_machines/combination_vending_machines/combo/manual/ |
 |
| http://www.mcmaster.com/#auger-conveyors/=ecttus |
Smexy pdf images: http://www.screwconveyors.com/profile2006x.pdf
mmm online worksheet AND considerations pdf: http://www.kwsmfg.com/products/Screw-Conveyors.htm, http://www.kwsmfg.com/pdf/KWS-0709PBE.pdf . So I want "shaftless screw conveyor"
Ewww, this just 'cos it has a pic of a screw conveyor used in a slaughterhouse: http://drycake.com/equipment/screening/downloads/Screening_Catalogue.pdf
Making Things Talk mentions it briefly... I wonder where I get a "big screw" (via libproxy.mit.edu): http://proquest.safaribooksonline.com/book/hobbies/9780596510510/chapter-9dot-identification/301?reader=pf&readerfullscreen=&readerleftmenu=1
Interesting tidbits about vending machine locks: http://books.google.com/books?id=6tRcZtGADBcC&lpg=PA142&ots=KBqWOPS2Jk&dq=vending%20machine%20screw%20mechanism&pg=PA143#v=onepage&q=vending%20machine%20screw%20mechanism&f=false
Subscribe to:
Posts (Atom)